
By Er. Rakesh Garg
Automobile Engineer | Founder – FixWise India
Introduction
A car headlight suddenly stops working, and the first thing many people do is buy a new bulb. Unfortunately, a blown bulb is not always the cause. The problem could be a fuse, relay, combination switch, wiring, poor earthing, or even the Body Control Module (BCM) in modern vehicles.
Replacing parts without proper diagnosis wastes both time and money.
This guide will help you identify the fault step by step before replacing any components.
Difficulty Level
⭐⭐☆☆☆ Easy to Moderate
Time Required
15–30 Minutes
Tools Required
- Digital Multimeter
- Test Lamp
- Screwdriver Set
- Fuse Puller
- Spare Fuse
- Vehicle Owner’s Manual
- Replacement Bulb (if required)
Step 1 – Identify the Problem
First, determine exactly what has failed.
Situation A
✅ Only one headlight is not working.
Go to Section A
Situation B
✅ Both headlights are not working.
Go to Section B
SECTION A
Only One Headlight is Not Working
This usually indicates a fault local to that headlight.
Step 1
Check the Bulb
Inspect the bulb filament.
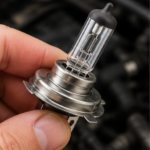
If the filament is broken or blackened, replace the bulb with the correct specification recommended by the vehicle manufacturer.
Step 2
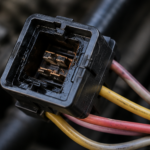
Inspect the Bulb Holder
Look for
- Burn marks
- Loose fitting
- Melted plastic
- Corrosion
A damaged holder may cause intermittent operation.
Step 3
Check the Wiring
Inspect wiring near the headlamp assembly.
Look for
- Broken wires
- Loose connectors
- Rodent damage
- Damaged insulation
Step 4
Check Earthing (Ground)
Poor earthing is a common reason for dim or non-working headlights.
Symptoms include
- Dim light
- Flickering
- Light working intermittently
Ensure the ground connection is clean and tight.
SECTION B
Both Headlights are Not Working
If both headlights fail together, the problem is usually elsewhere in the electrical system.
Follow these checks in order.
Step 1
Check Battery Voltage
If the battery voltage is low, electrical accessories may not operate correctly.
Check
- Battery terminals
- Corrosion
- Loose clamps
Step 2
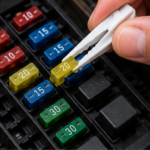
Check the Headlight Fuse
Locate the fuse box using the owner’s manual.
Remove the headlight fuse.
If blown,
Replace it with another fuse of exactly the same amperage.
Never use a higher-rated fuse.
Step 3
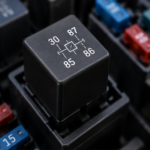
Check the Headlight Relay
Many vehicles use a relay to supply power to the headlights.
A faulty relay can prevent both headlights from working.
Easy Test
If another identical relay is available in the fuse box,
Swap the two relays.
If the headlights start working,
Replace the faulty relay.
Step 4
Check the Combination Switch
Modern vehicles generally use a combination switch mounted on the steering column to operate:
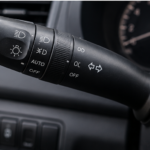
- Parking lamps
- Headlights
- High beam
- Headlight flash
- Indicators (on many vehicles)
Possible symptoms include
- Headlights not turning ON
- High beam working but low beam not working
- Flash function working but headlights not working
- Lights flickering when operating the lever
If these symptoms are present, the combination switch may require inspection or replacement.
Step 5
Check the Body Control Module (BCM)
Many modern vehicles control the lighting system through a Body Control Module.
If
- Bulbs
- Fuse
- Relay
- Combination switch
are all functioning correctly, the fault may lie in the BCM or its associated circuits.
Diagnosis usually requires a professional scan tool.
Step 6
Inspect the Wiring Harness
Look for
- Accident damage
- Burnt wiring
- Loose connectors
- Water ingress
- Rodent damage
Electrical repairs should be carried out carefully to avoid further damage.
Check Which Lights Are Working
Before replacing any parts, test:
✅ Parking Lamps
✅ Low Beam
✅ High Beam
✅ Headlight Flash
✅ Fog Lamps (if equipped)
These observations help narrow down the fault.
FixWise Expert Tip
🟢 Never replace multiple electrical components without diagnosis.
Start with the simplest checks—bulb, fuse, connector, and relay. Replacing parts at random can increase repair costs and may not solve the actual problem.
Safety Tips
- Never touch the glass of a halogen bulb with bare fingers.
- Disconnect the battery before carrying out major electrical repairs.
- Always use the correct replacement bulb and fuse rating.
- Ensure all electrical connectors are firmly seated after reassembly.
When Should You Visit a Mechanic?
Seek professional assistance if:
- Both headlights remain inoperative after basic checks.
- Fuses continue to blow repeatedly.
- Wiring is burnt or damaged.
- Water has entered the headlamp assembly.
- A BCM or advanced electrical fault is suspected.
Quick Diagnostic Checklist
☐ Is one headlight or both headlights not working?
☐ Check the bulb.
☐ Inspect the bulb holder.
☐ Check the wiring.
☐ Verify the earthing connection.
☐ Check battery voltage.
☐ Inspect the fuse.
☐ Test the relay.
☐ Check the combination switch.
☐ Consider BCM diagnosis if all other checks pass.
Conclusion
A headlight failure does not always mean a faulty bulb. A systematic diagnosis can help identify the real cause, save unnecessary expenses, and ensure your vehicle remains safe to drive. Always start with the simplest checks and work through the electrical system methodically before replacing any parts.
About the Author
Er. Rakesh Garg is an Automobile Engineer with practical experience in vehicle diagnostics, maintenance, and DIY repairs. Through FixWise India, he shares step-by-step troubleshooting guides to help car owners understand common vehicle problems before replacing parts or visiting a workshop.